Why You’ll Love This Recipe
If you’re looking for a fun, no-bake dessert that instantly brings smiles, these Easter Dirt Cake Cups are exactly what you need. They are creamy, chocolatey, and layered with that nostalgic “dirt and worms” look that kids absolutely adore. I’ve made these for family gatherings, and they disappear faster than anything else on the table. What I love most is how simple they are—no oven, minimal prep, and easy to customize with festive Easter toppings. Whether you’re planning a party or just want a playful dessert to make with your kids, this recipe is a guaranteed hit.
Print
Irresistible Easter Dirt Cake Cups Kids Can’t Get Enough Of
- Total Time: 1 hour 20 minutes
- Yield: 8 cups
- Diet: Vegetarian
Description
Fun and festive Easter Dirt Cake Cups made with layers of creamy pudding, crushed chocolate cookies, and topped with colorful candy eggs—perfect for kids and easy no-bake treats.
Ingredients
- 1 package (3.9 oz) instant chocolate pudding mix
- 2 cups cold milk
- 1 cup whipped topping (like Cool Whip)
- 1 package (about 14 oz) chocolate sandwich cookies (crushed)
- 1/2 cup cream cheese (softened)
- 1/4 cup unsalted butter (softened)
- 1/2 cup powdered sugar
- 1 teaspoon vanilla extract
- 1 cup mini chocolate eggs or candy-coated chocolates
- Gummy worms (optional)
Instructions
- In a bowl, whisk together chocolate pudding mix and cold milk until thickened. Set aside.
- In another bowl, beat cream cheese, butter, and powdered sugar until smooth and creamy.
- Mix in vanilla extract, then fold in whipped topping.
- Combine the cream mixture with the pudding until fully blended.
- Crush chocolate cookies into fine crumbs.
- In serving cups, layer cookie crumbs, pudding mixture, then more crumbs.
- Repeat layers until cups are filled, ending with cookie crumbs on top.
- Decorate with mini chocolate eggs and gummy worms.
- Refrigerate for at least 1 hour before serving.
Notes
- Use clear cups to show the fun layered effect.
- You can swap chocolate pudding for vanilla for a lighter flavor.
- Crush cookies finely for a realistic “dirt” look.
- Keep refrigerated until ready to serve.
- Prep Time: 20 minutes
- Cook Time: 0 minutes
- Category: Dessert
- Method: No-Bake
- Cuisine: American
Ingredients
(Tip: You can find the complete list of ingredients and their measurements in the recipe card below.)
Chocolate sandwich cookies
These create the “dirt” layer and give the dessert its signature look. Once crushed, they add a rich chocolate flavor and a slightly crunchy texture that balances the creaminess perfectly.
Cream cheese
This is the base of the filling and adds a smooth, slightly tangy richness. Make sure it’s softened for easy mixing and a lump-free texture.
Powdered sugar
This sweetens the cream cheese mixture without making it grainy. It blends seamlessly, creating a silky consistency.
Vanilla extract
A small amount enhances the overall flavor and adds warmth to the dessert. It brings everything together beautifully.
Whipped topping
This makes the filling light, airy, and irresistibly creamy. I once tried it with homemade whipped cream, and it worked just as well.
Instant chocolate pudding mix
This adds deep chocolate flavor and thickens the dessert. It’s quick, easy, and essential for that classic dirt cake taste.
Milk
Used to prepare the pudding, it helps achieve the perfect creamy consistency. Whole milk works best for richness.
Gummy worms or Easter candies
These are the fun part. They turn the dessert into a playful treat that kids love decorating and eating.
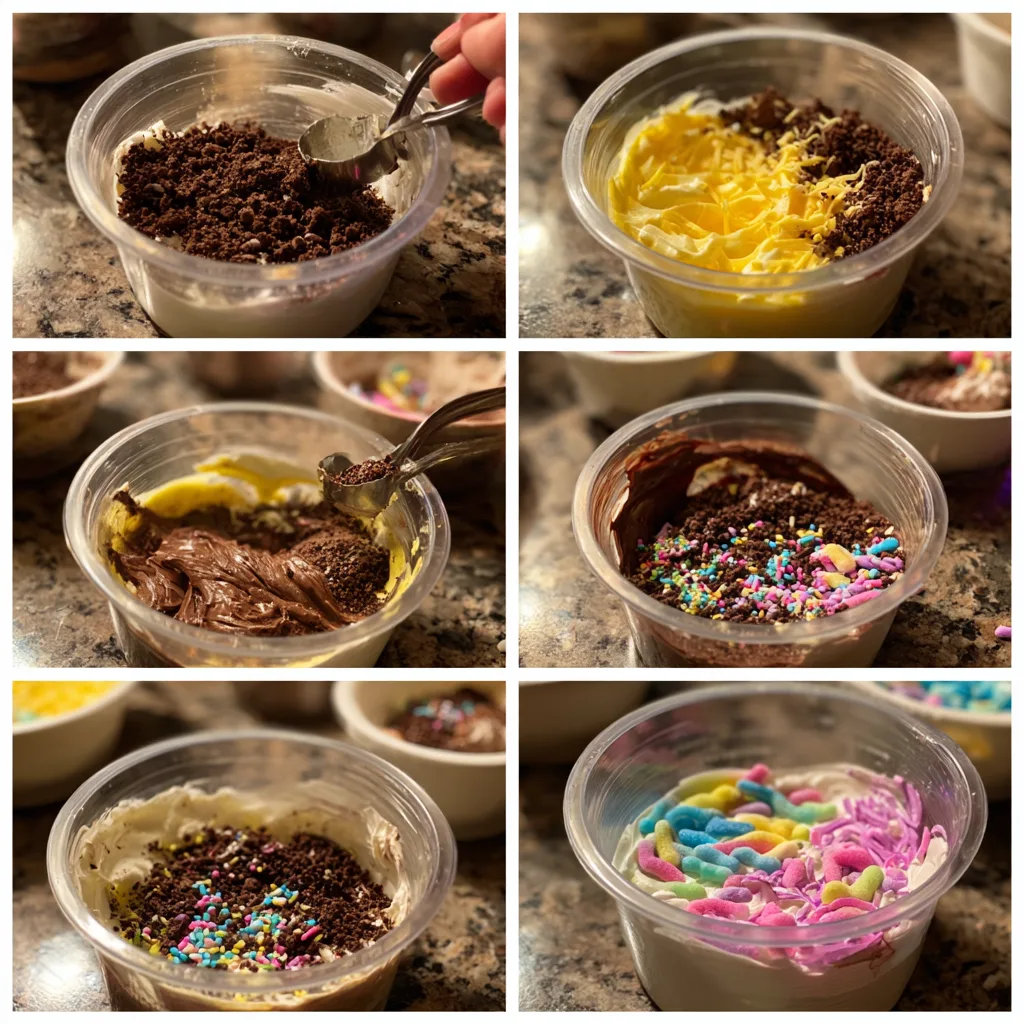
Directions
Start by crushing the chocolate sandwich cookies into fine crumbs. You can use a food processor or place them in a sealed bag and crush them with a rolling pin. Set aside.
In a large bowl, beat the softened cream cheese until smooth. Add the powdered sugar and vanilla extract, then mix until fully combined and creamy.
In a separate bowl, prepare the chocolate pudding using cold milk. Whisk until it thickens, then let it sit for a few minutes to fully set.
Fold the whipped topping into the cream cheese mixture gently until smooth and fluffy. Then, add the prepared pudding and mix until everything is well combined.
To assemble, layer the dessert in small cups. Start with a layer of cookie crumbs, then add a layer of the creamy mixture. Repeat until the cups are filled, finishing with cookie crumbs on top.
Decorate with gummy worms or Easter-themed candies. Chill in the refrigerator for at least 1–2 hours before serving for the best texture.
Equipment needed : Must-Have Tools to Get Rolling
Here’s what you’ll want to have on hand:
Silicone Spatula – Durable, heat-resistant silicone spatula perfect for mixing, scraping, and spreading. Gentle on non-stick cookware and easy to clean.
Large pot – You’ll need this to boil the whole cabbage head and soften the leaves.
large bowl –Spacious, durable large bowl ideal for mixing, serving, or food preparation. Made from sturdy material and easy to clean.
Sharp knife – For coring the cabbage and slicing out the thick stem in each leaf. A paring knife works best.
Mixing bowl – A big bowl makes it easier to combine your meat and rice filling evenly.
Cutting board – For prepping cabbage leaves and rolling them like a pro.
Full-Size Blender – is a powerful kitchen appliance for making smoothies, soups, and sauces in large batches.
3-in-1 Air Fryer – This versatile 3-in-1 air fryer offers Air Fry for healthier meals with less oil, Bake for bakery-quality desserts and treats, and Reheat to bring leftovers back to life with crispy, flavorful results
Servings and timing
This recipe makes approximately 8 servings. Preparation takes about 20 minutes, with an additional chilling time of 1–2 hours for best results.
Storage/reheating
Store the dirt cake cups covered in the refrigerator for up to 3 days. They are best served chilled, and no reheating is required.
Variations and Customizations
One of the best things about Easter Dirt Cake Cups is how versatile they are. You can easily switch things up depending on your preferences or what you have on hand.
For a lighter version, try using low-fat cream cheese and light whipped topping. The texture remains creamy while reducing the richness slightly. I’ve also experimented with vanilla pudding instead of chocolate, and it creates a completely different but equally delicious flavor profile.
If you want to make it more festive, swap gummy worms for Easter-themed candies like mini chocolate eggs, marshmallow chicks, or pastel sprinkles. Kids especially love decorating their own cups, which makes this a fun interactive activity.
For a more grown-up twist, you can add a layer of crushed peanut butter cups or drizzle caramel between the layers. It adds depth and a surprising flavor boost.
You can also make this dessert in one large dish instead of individual cups if you’re serving a crowd. It’s easier to assemble and still looks impressive when scooped.
For dietary needs, try gluten-free chocolate cookies or dairy-free alternatives. I once made it with almond milk and dairy-free whipped topping, and it turned out wonderfully creamy.
Nutrition and Dietary Info
| Nutrient | Per Serving |
|---|---|
| Calories | 320 kcal |
| Protein | 4 g |
| Carbohydrates | 38 g |
| Fat | 18 g |
| Saturated Fat | 10 g |
| Fiber | 2 g |
| Sugar | 24 g |
| Sodium | 280 mg |
Expert Tips & Customizations
Use softened cream cheese for a smoother filling
This prevents lumps and ensures a creamy texture.
Crush cookies finely for the best “dirt” effect
Finer crumbs create a more realistic and cohesive layer.
Chill before serving
This helps the layers set and improves the overall taste.
Layer neatly for presentation
Clear cups show off the beautiful layers and make the dessert more appealing.
Let kids decorate their own cups
It turns dessert into a fun and memorable activity.
FAQs
Can I make this dessert ahead of time?
Yes, it’s actually better when made a few hours in advance so the flavors can blend and the texture sets nicely.
Can I freeze dirt cake cups?
Freezing is not recommended as it can affect the creamy texture once thawed.
What can I use instead of whipped topping?
You can use homemade whipped cream as a substitute for a more natural option.
Are there gluten-free options?
Yes, simply use gluten-free chocolate cookies and ensure all other ingredients are certified gluten-free.
Can I use a different pudding flavor?
Absolutely, vanilla or even cookies and cream pudding work well for a unique twist.
How do I make it less sweet?
Reduce the powdered sugar slightly or use a less sweet whipped topping alternative.
Conclusion
Easter Dirt Cake Cups are the perfect combination of fun, flavor, and simplicity. With their creamy layers and playful presentation, they’re guaranteed to be a crowd favorite, especially among kids. Whether you stick to the classic version or get creative with your own variations, this dessert is a delightful way to celebrate the season. Once you try it, it might just become your new Easter tradition.
Hungry for more? Visit our website for full recipes and follow us on Pinterest for daily foodie inspo you’ll love to pin!