Introduction
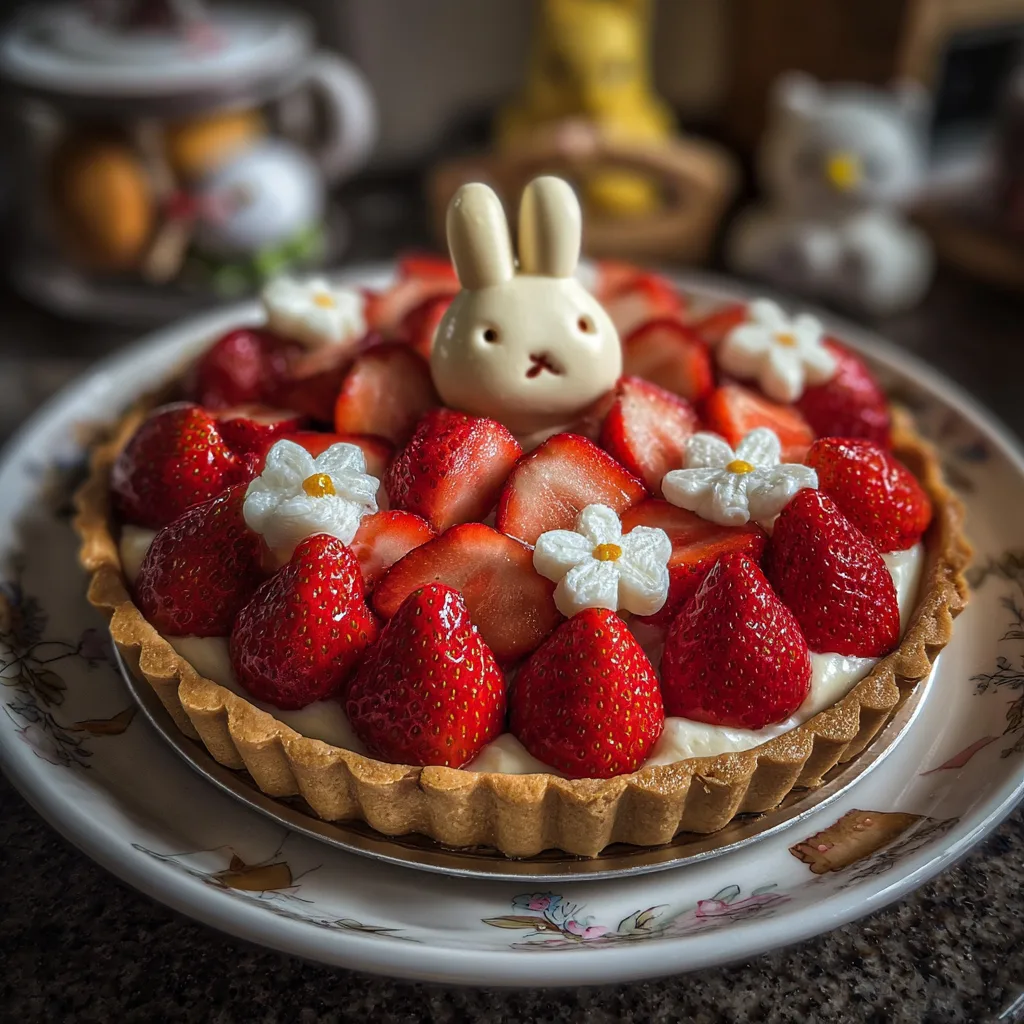
Miffy Strawberry Cheesecake Tart is a charming dessert that combines a creamy cheesecake filling with a buttery tart crust and a playful design inspired by the beloved character. This dessert is not only visually delightful but also wonderfully balanced in flavor. The smooth, lightly sweetened cream cheese filling pairs beautifully with fresh strawberries, creating a refreshing yet indulgent treat. The first time I made this tart, I was amazed by how the simple decorative touches transformed it into a show-stopping centerpiece. I once added a thin layer of strawberry jam beneath the cheesecake filling, and it added a subtle fruity depth that worked beautifully. Perfect for birthdays, themed parties, or simply when you want something special, this tart delivers both flavor and charm. Despite its impressive appearance, the preparation is straightforward, making it accessible for bakers of all levels.
Print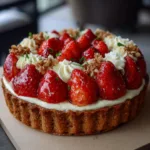
Miffy Strawberry Cheesecake Tart – Adorable, Creamy, and Delightfully Sweet
- Total Time: 3 hours 35 minutes
- Yield: 8 servings
- Diet: Vegetarian
Description
Miffy Strawberry Cheesecake Tart is an adorable and creamy dessert featuring a buttery tart crust filled with smooth vanilla cheesecake and topped with fresh strawberries, decorated with a cute Miffy design for a playful finish.
Ingredients
- 1 1/2 cups crushed digestive biscuits or graham crackers
- 1/3 cup unsalted butter, melted
- 8 oz cream cheese, softened
- 1/2 cup granulated sugar
- 1 teaspoon vanilla extract
- 1/2 cup heavy whipping cream
- 1 tablespoon lemon juice
- 1 cup fresh strawberries, sliced
- 1/4 cup strawberry jam (for glaze)
- White fondant or white chocolate (for Miffy decoration)
- Dark chocolate (for facial details)
Instructions
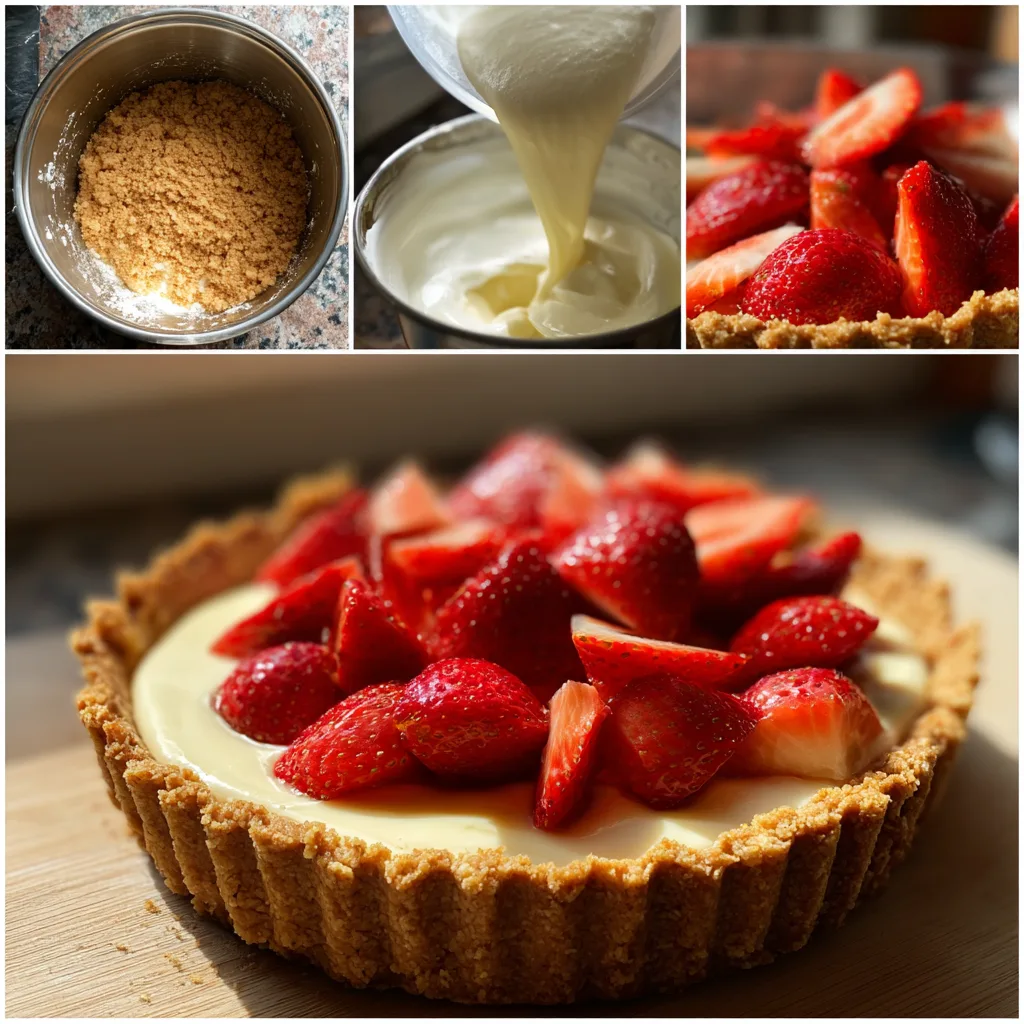
- Preheat oven to 350°F (175°C). Mix crushed biscuits with melted butter and press firmly into a tart pan. Bake for 8–10 minutes, then cool completely.
- In a bowl, beat cream cheese and sugar until smooth. Add vanilla and lemon juice and mix well.
- In a separate bowl, whip heavy cream until soft peaks form, then fold gently into the cream cheese mixture.
- Spread cheesecake filling evenly into the cooled crust and smooth the top.
- Arrange sliced strawberries over the filling.
- Warm strawberry jam slightly and brush over strawberries for a glossy finish.
- Roll out white fondant (or melted and shaped white chocolate) to create a Miffy face topper. Use melted dark chocolate to draw eyes and mouth.
- Place the Miffy decoration on top of the tart.
- Refrigerate for at least 3 hours before slicing and serving.
Notes
- Ensure cream cheese is fully softened for a smooth filling.
- Chill thoroughly before decorating for best results.
- Use a stencil for a precise Miffy design.
- Store refrigerated for up to 3 days.
- Prep Time: 25 minutes
- Cook Time: 10 minutes
- Category: Dessert
- Method: Bake
- Cuisine: Japanese
Why You’ll Love This Recipe
This tart is creamy, fruity, and visually adorable. It combines a crisp buttery crust with smooth cheesecake filling and fresh strawberries. It is ideal for celebrations, easy to prepare ahead of time, and guaranteed to impress guests.
Ingredients
(Tip: You can find the complete list of ingredients and their measurements in the recipe card below.)
Ingredients Breakdown
All-purpose flour
Forms the base of the tart crust, providing structure and a tender crumb.
Unsalted butter
Cold butter creates a flaky, rich crust when blended with flour.
Granulated sugar
Adds subtle sweetness to the crust and balances the tangy filling.
Egg yolk
Helps bind the crust together and adds richness.
Cream cheese
The star of the filling, providing smooth, creamy texture and mild tang.
Powdered sugar
Sweetens the cheesecake filling while keeping it silky smooth.
Heavy cream
Whipped and folded into the filling for a light, airy consistency.
Vanilla extract
Enhances the overall flavor and adds warmth.
Fresh strawberries
Provide bright flavor, natural sweetness, and vibrant color.
Strawberry jam
Adds shine and intensifies the strawberry flavor.
White chocolate or fondant (for decoration)
Used to create the simple Miffy face design for an adorable finish.
Directions
Preheat your oven to 350°F (175°C). In a mixing bowl, combine flour and sugar. Cut in cold butter until the mixture resembles coarse crumbs. Add egg yolk and mix until a dough forms. Press the dough evenly into a tart pan, including the sides. Chill for 15 minutes, then bake for 15–18 minutes until lightly golden. Allow to cool completely.
In a large bowl, beat softened cream cheese and powdered sugar until smooth. Add vanilla extract and mix well. In a separate bowl, whip heavy cream until soft peaks form, then gently fold into the cream cheese mixture until fully incorporated.
Spread a thin layer of strawberry jam over the cooled tart crust if desired. Spoon the cheesecake filling into the crust and smooth the top evenly.
Arrange fresh strawberries decoratively over the filling. Warm a small amount of strawberry jam and brush lightly over the fruit to create a glossy finish.
For the Miffy design, use melted white chocolate or fondant to create the simple face details on top of the tart. Refrigerate for at least 3 hours before serving to allow the filling to set.
Equipment needed : Must-Have Tools to Get Rolling
Here’s what you’ll want to have on hand:
Silicone Spatula – Durable, heat-resistant silicone spatula perfect for mixing, scraping, and spreading. Gentle on non-stick cookware and easy to clean.
Large pot – You’ll need this to boil the whole cabbage head and soften the leaves.
large bowl –Spacious, durable large bowl ideal for mixing, serving, or food preparation. Made from sturdy material and easy to clean.
Sharp knife – For coring the cabbage and slicing out the thick stem in each leaf. A paring knife works best.
Mixing bowl – A big bowl makes it easier to combine your meat and rice filling evenly.
Cutting board – For prepping cabbage leaves and rolling them like a pro.
Full-Size Blender – is a powerful kitchen appliance for making smoothies, soups, and sauces in large batches.
3-in-1 Air Fryer – This versatile 3-in-1 air fryer offers Air Fry for healthier meals with less oil, Bake for bakery-quality desserts and treats, and Reheat to bring leftovers back to life with crispy, flavorful result
Servings and timing
Servings: 8–10 slices
Preparation time: 25 minutes
Baking time: 18 minutes
Chilling time: 3 hours
Total time: 3 hours 45 minutes
Storage/reheating
Store the tart in an airtight container in the refrigerator for up to 3 days. Because of the fresh fruit and cream filling, it should remain chilled until serving. This dessert is not suitable for reheating or freezing, as the texture may be affected.
Variations and Customizations
This cheesecake tart can be customized in many ways. For a no-bake crust option, substitute the pastry crust with a crushed biscuit and melted butter mixture pressed into the tart pan and chilled until firm.
I have also experimented with adding a small amount of lemon zest to the filling, which brightens the flavor and complements the strawberries beautifully.
If strawberries are not in season, raspberries or blueberries make excellent alternatives. You can even create a mixed berry version for added color and variety.
For a chocolate variation, drizzle melted dark chocolate lightly over the strawberries before adding the decorative design.
If you prefer a sweeter finish, increase the powdered sugar slightly or use sweetened whipped cream. For a more refined presentation, pipe the cheesecake filling using a pastry bag before arranging the fruit.
Finally, consider preparing individual mini tartlets for parties, which makes serving easier and enhances presentation.
Nutrition and Dietary Info
Approximate nutrition per serving (based on 10 servings):
| Nutrient | Amount per Serving |
|---|---|
| Calories | 420 kcal |
| Protein | 5 g |
| Carbohydrates | 36 g |
| Fat | 29 g |
| Saturated Fat | 17 g |
| Fiber | 2 g |
| Sugar | 22 g |
| Sodium | 210 mg |
Values are estimates and may vary depending on ingredient brands and portion sizes.
Expert Tips & Customizations
Chill the Crust Before Baking
This helps prevent shrinking during baking.
Use Room Temperature Cream Cheese
Ensures a smooth and lump-free filling.
Whip Cream to Soft Peaks
Avoid overwhipping to maintain a light texture.
Decorate After Chilling
Adding decorative details once the tart is set ensures clean, defined lines.
FAQs
Can I make this tart ahead of time?
Yes, it can be prepared a day in advance and stored in the refrigerator.
Can I use frozen strawberries?
Fresh strawberries are recommended for best texture and presentation.
How do I prevent a soggy crust?
Allow the crust to cool completely before adding filling and jam.
Can I make it without a tart pan?
Yes, a pie dish can be used, though the edges may be less defined.
Is this cheesecake baked?
The crust is baked, but the cheesecake filling is no-bake.
How long does it need to chill?
At least 3 hours to ensure the filling sets properly.
Conclusion
Miffy Strawberry Cheesecake Tart is a delightful combination of creamy filling, fresh fruit, and charming presentation. Its balance of sweetness and freshness makes it perfect for celebrations or special treats. With simple preparation and customizable options, this tart offers both visual appeal and delicious flavor in every slice.
Hungry for more? Visit our website for full recipes and follow us on Pinterest for daily foodie inspo you’ll love to pin!